

Upstairs Renovation Reveal Part 1: Refinishing The Floors for Teddy’s Big-Boy Room
This post is made possible by a partnership with Sutherlands.

“It’s just a little paint,” I said. “And some poly on the floor.”
“It will only take few weeks,” I said.
Those were just some of the things I told my husband IN JANUARY to convince him that we absolutely needed to do the cosmetic renovations to the second floor of our 103-year-old Arts & Crafts bungalow that would allow us to fully move into the home we’d owned for nearly six years. We were long overdue; there were three bedrooms and a half bath just sitting (and storing some junk, of course) while we, our toddler, our two rowdy rescue mutts, and my roving home “office” were crammed into two tiny bedrooms on the main floor.
And you know what? If I wouldn’t have discovered — by momentum-killing accident reminiscent of that scene in Black Swan where Natalie Portman starts to pick at a hangnail then ends up pulling all the skin off her arm — that most of the walls up there were basically made of decades of paint atop wallpaper (layered over plaster, because of course) then I really would have finished in a couple of weeks. With just a little paint. And some poly on the floor.
But today we’re not talking about paint; I’m not emotionally ready, and to be honest, I haven’t finished painting yet. No, today, we’re here to talk about refinishing the floors — the part I thought would be the scariest and most time consuming, but was actually the quickest and easiest (given the wallpaper situation).
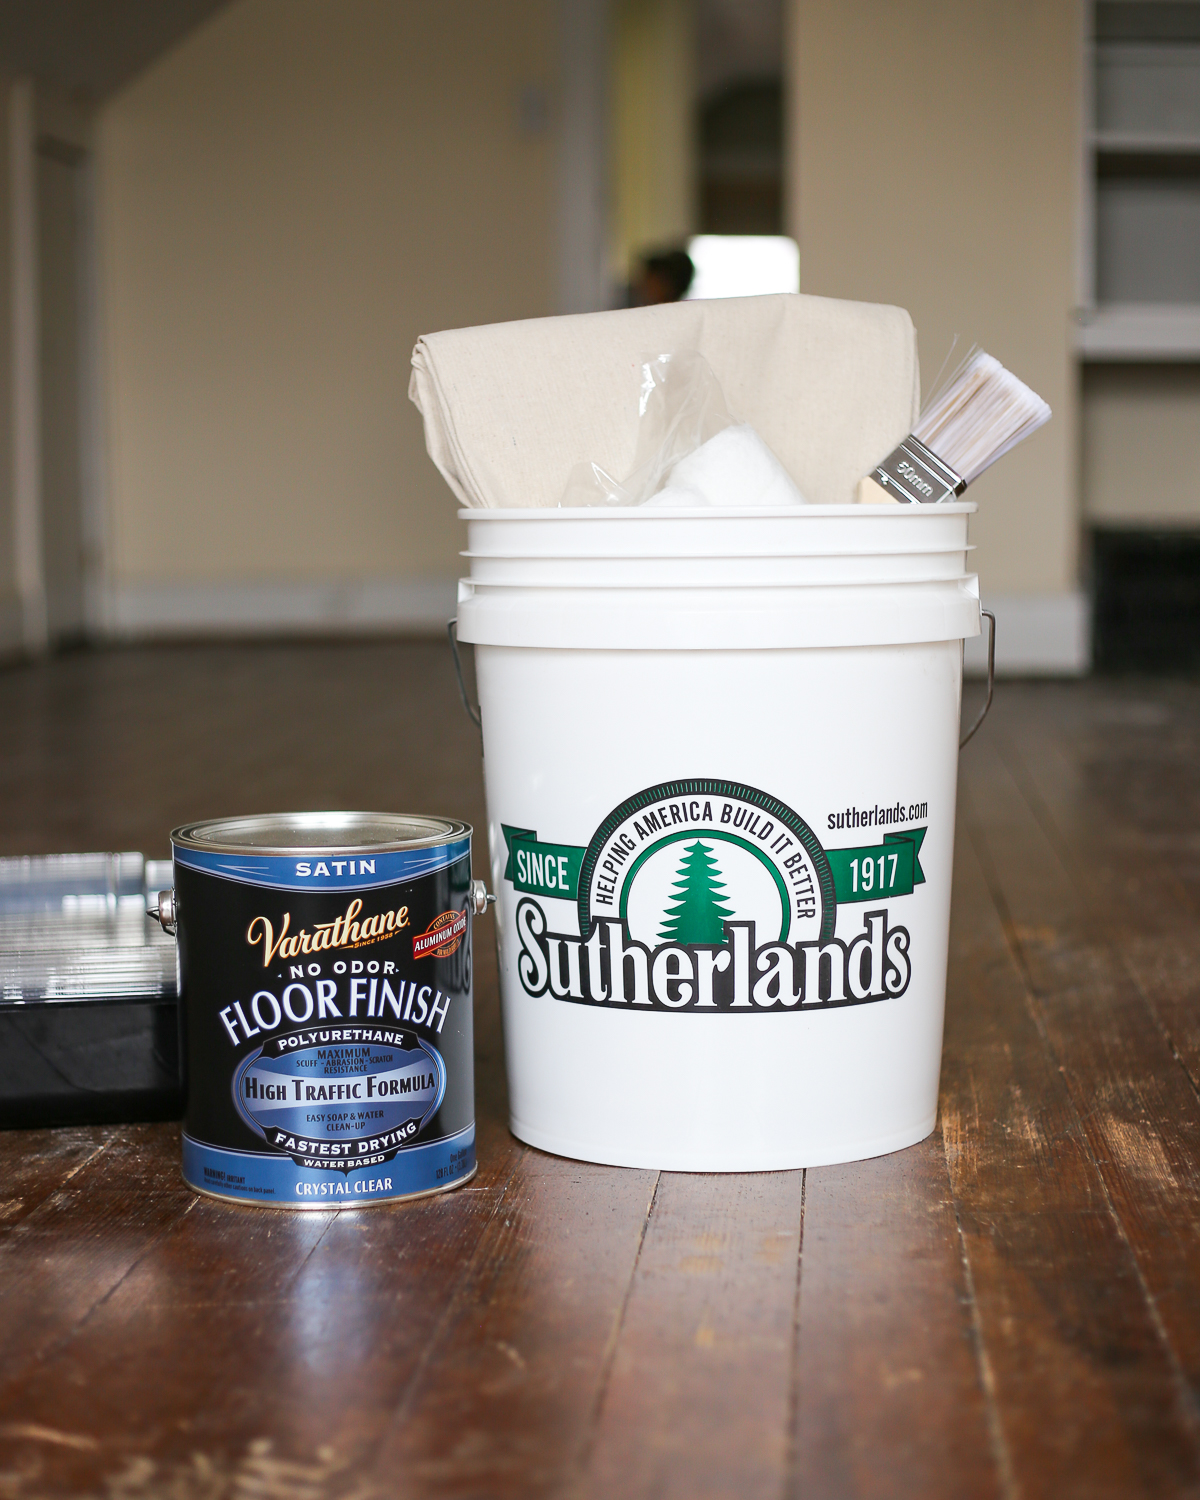
I have to admit this ease was due in large part to Shawn, who did the sanding for me, as well as my new favorite product, Varathane’s idiot-proof water-based floor finish.
Where We Started
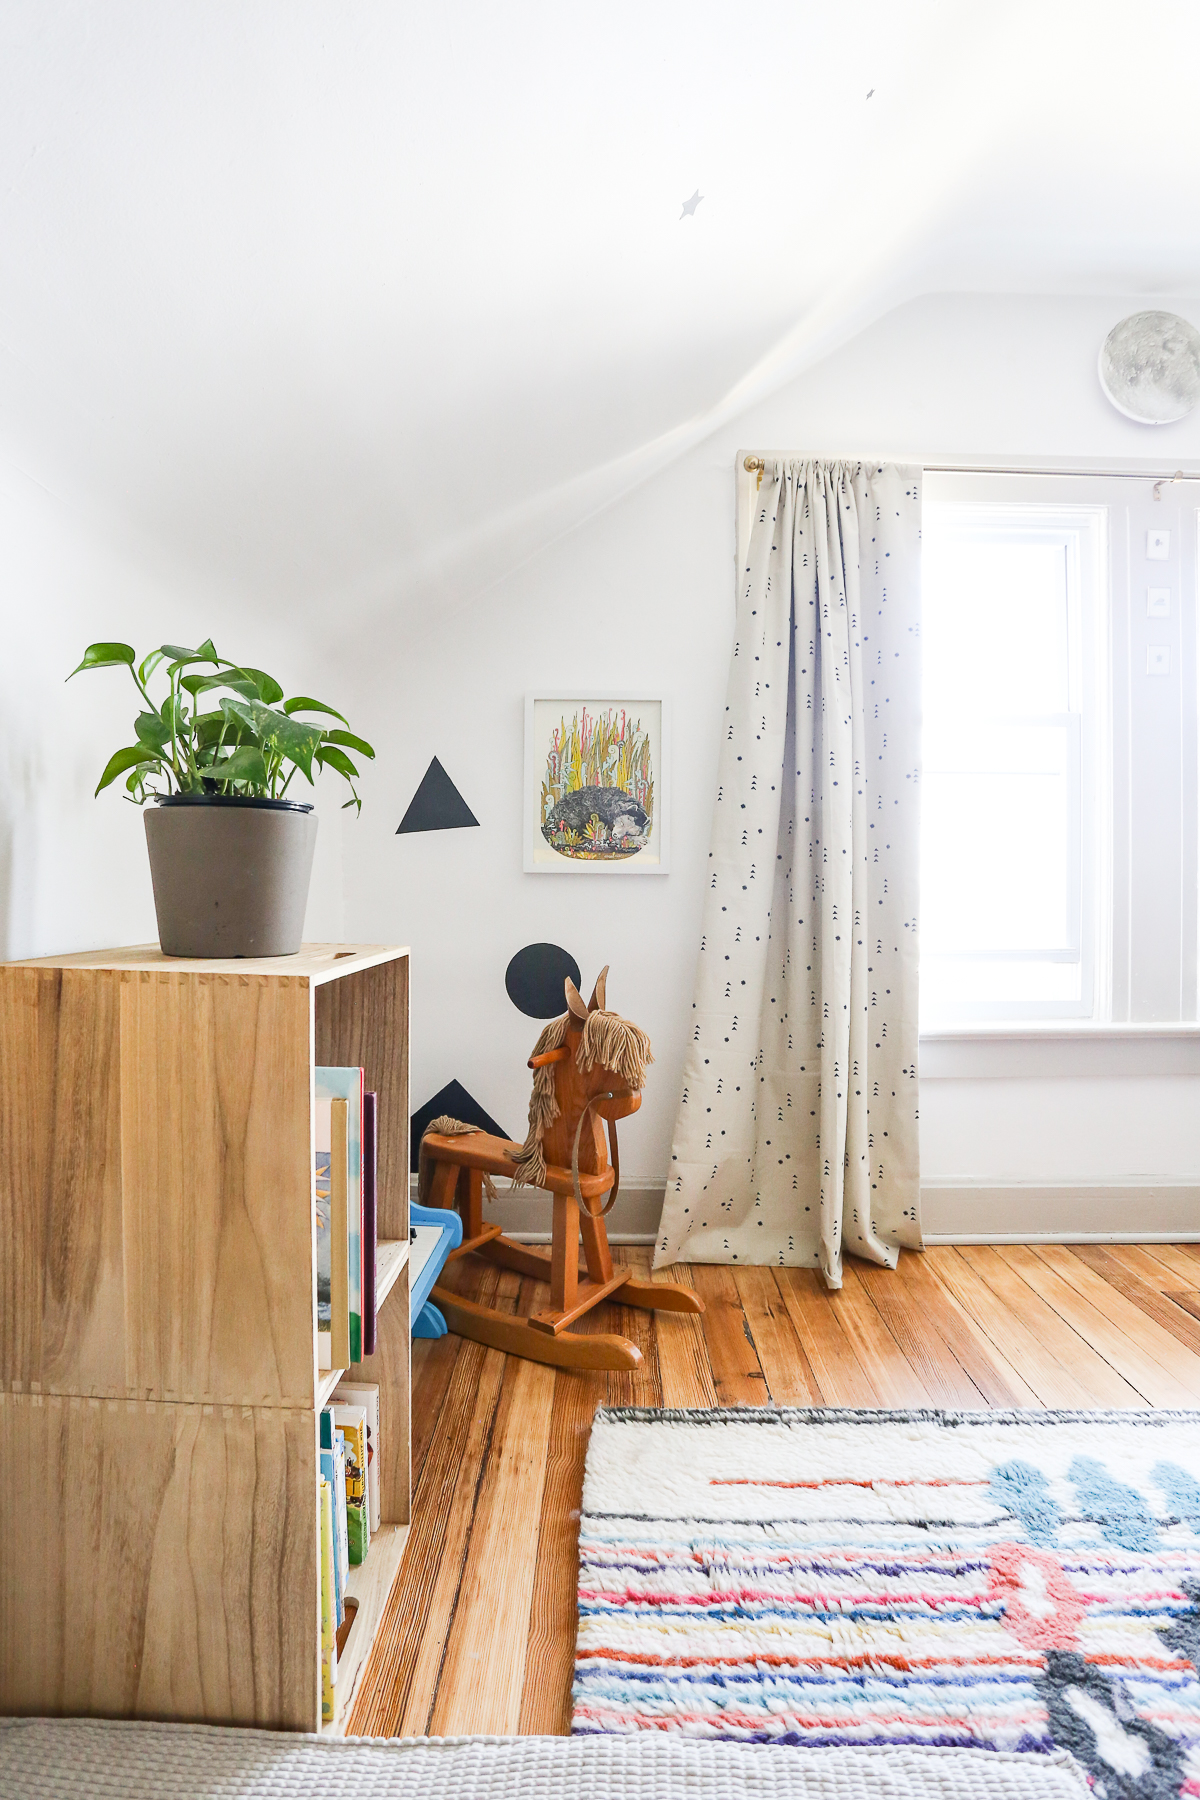
The floors weren’t in terrible shape to begin with, but of all the things that needed work up there, they needed the most. I didn’t feel safe walking on them in bare feet, so I sure as shit wasn’t going to let my toddler play on them.
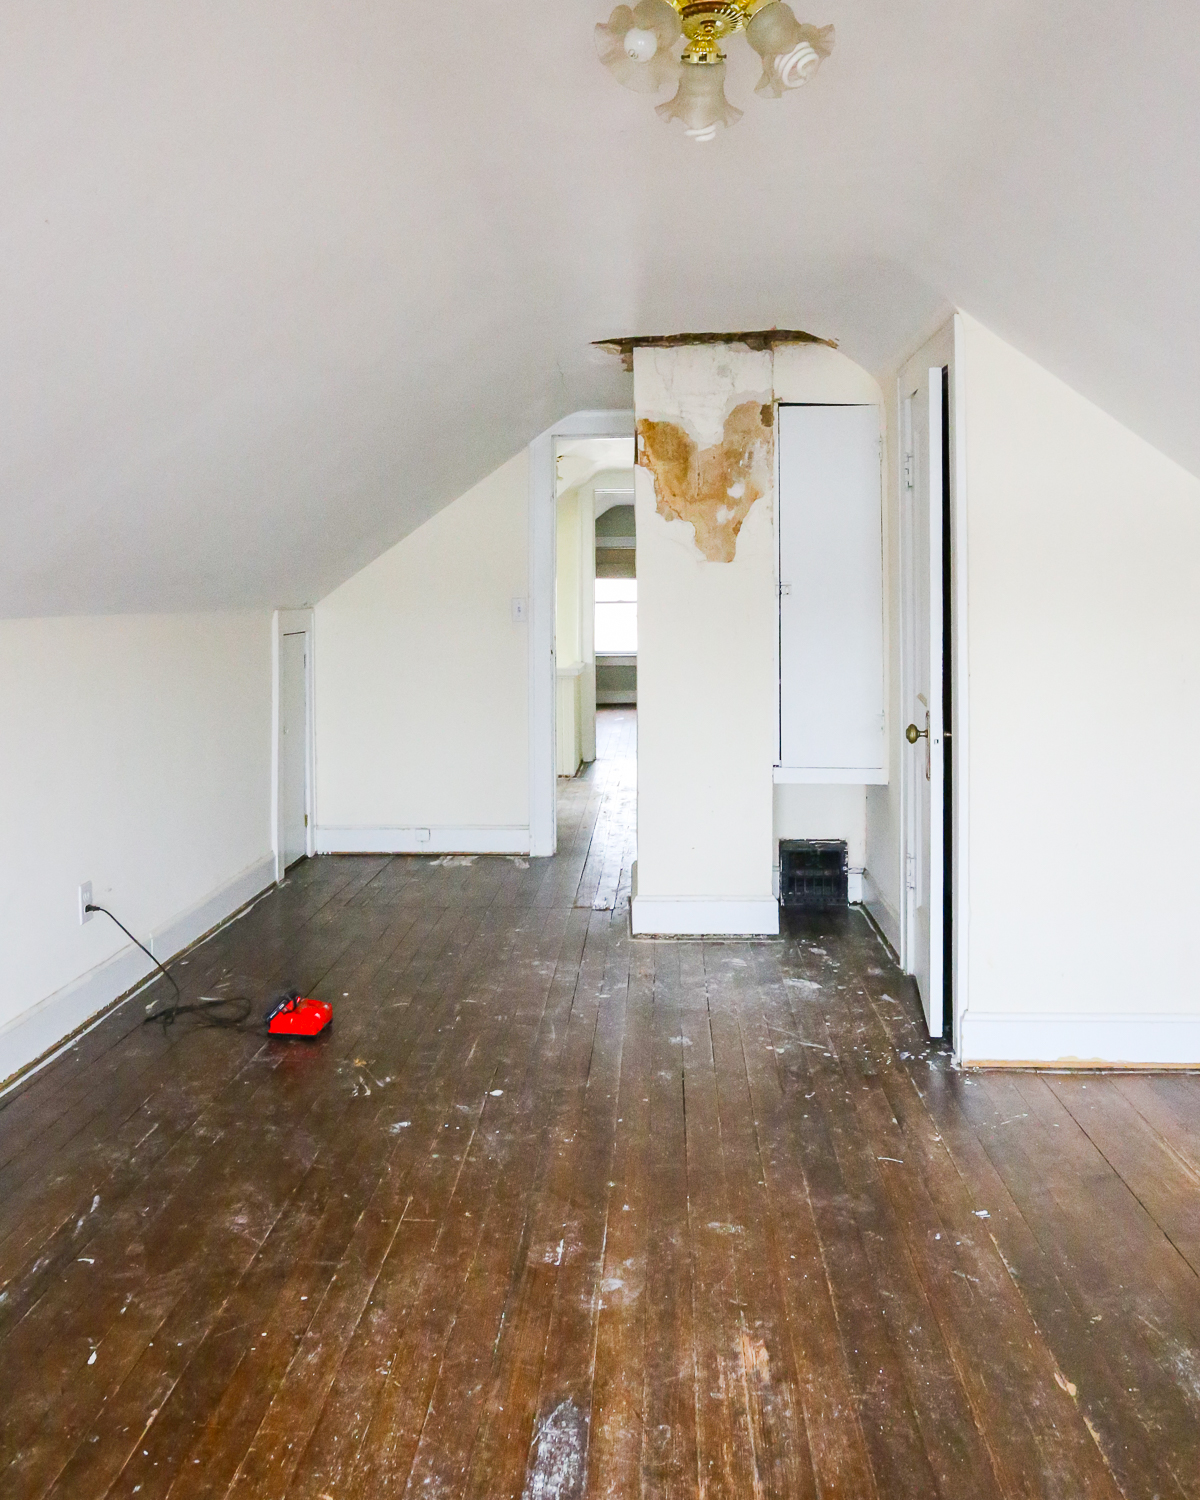
When we bought the house, the second floor was carpeted. But even behind a closed door (there’s a door in the dining room that conceals the stairway to our second floor), the smell of that old, cheap wall-to-wall carpeting was giving me headaches, so I had it ripped out. Plus, I knew there was hardwood underneath and I wanted to see what it looked like. It turned out to be scratched, dented, and covered in staples and paint splatters, but even with some weird patching and holes and bumps, I knew it wasn’t beyond repair. It just wasn’t a repair we were ready to make at the time, so our upstairs sat mostly unused for years.

As Teddy got bigger, we found we were quickly outgrowing the first floor of our house, so I reached out to my neighborhood hardware store, Sutherlands, to ask if they’d be interested in partnering on a little cosmetic renovation. To my surprise, they said “yes,” and I was ready to get to work. And also to put some other people to work because I’m a busy woman.
The Plan
Before we even started, I knew I wanted to just seal (versus stain and seal) whatever wood we’d uncover with the sander. I came to this decision mostly because I’m lazy and impatient and was working with a budget, but also because it was 100-year-old hardwood and I figured there was no way it could be ugly. I knew that even just sanding and sealing the floors would completely transform the space, and I was right.
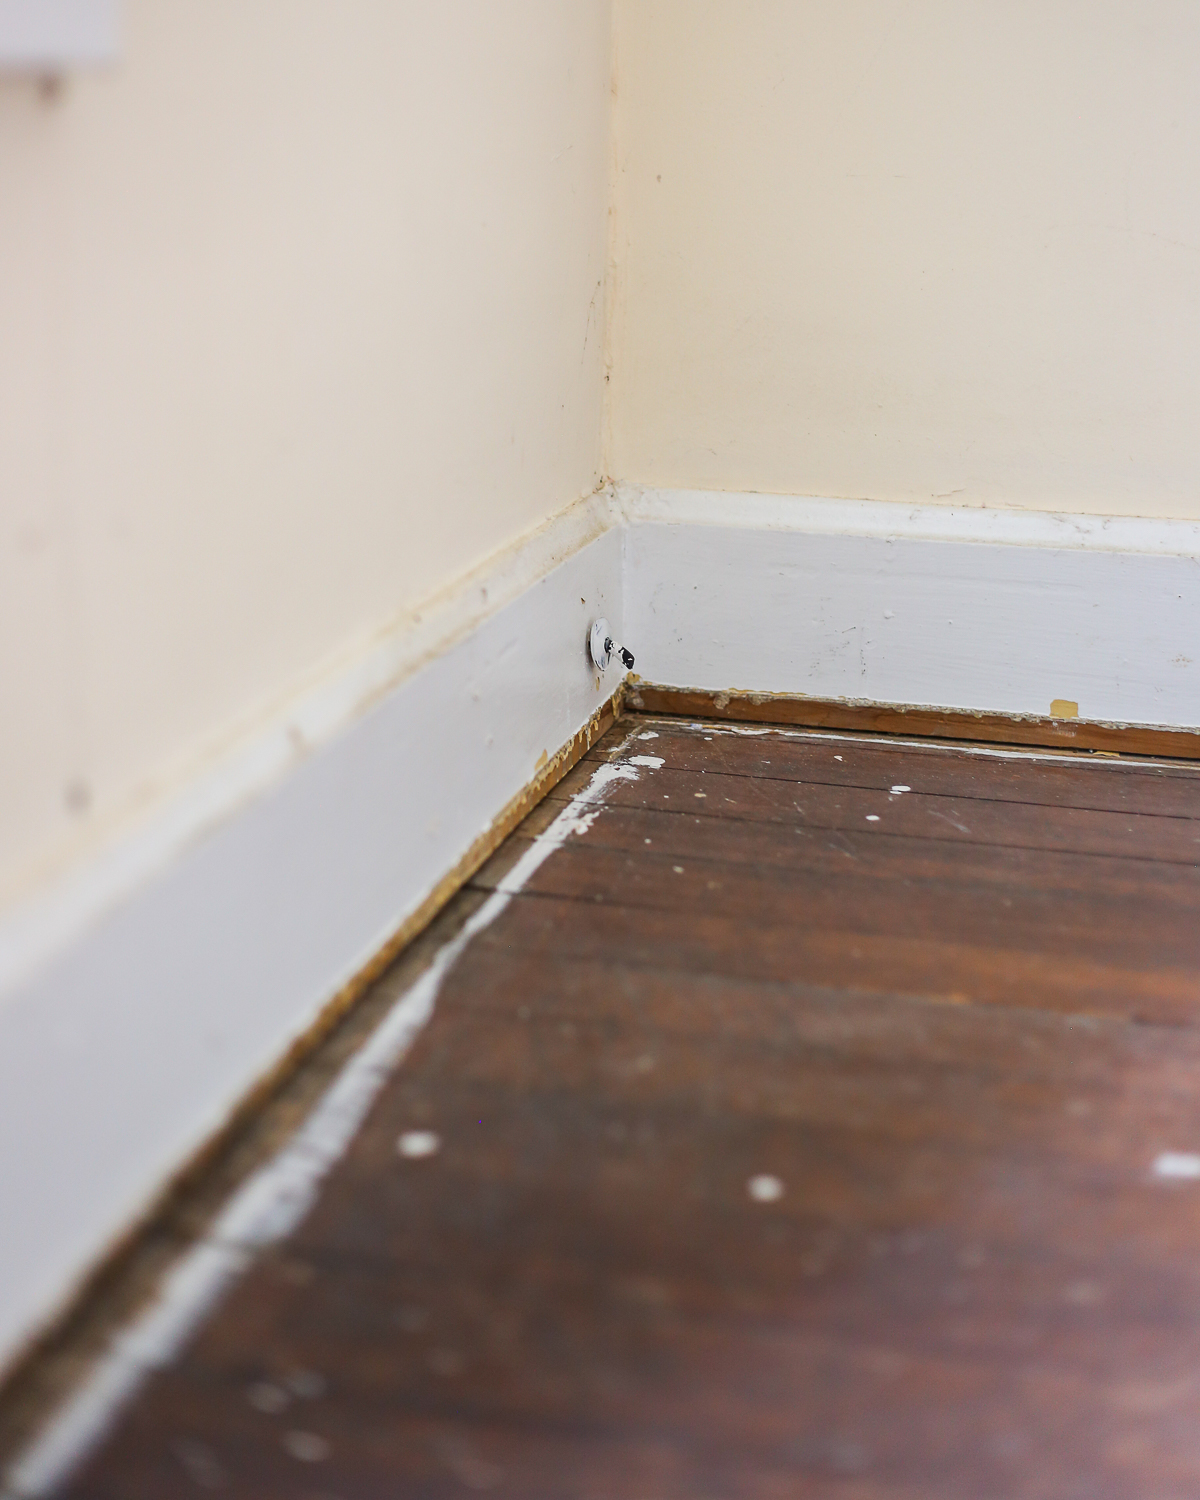
Here’s a closeup of the southeast corner of Teddy’s room before we started sanding.
Here it is after one coat of poly.

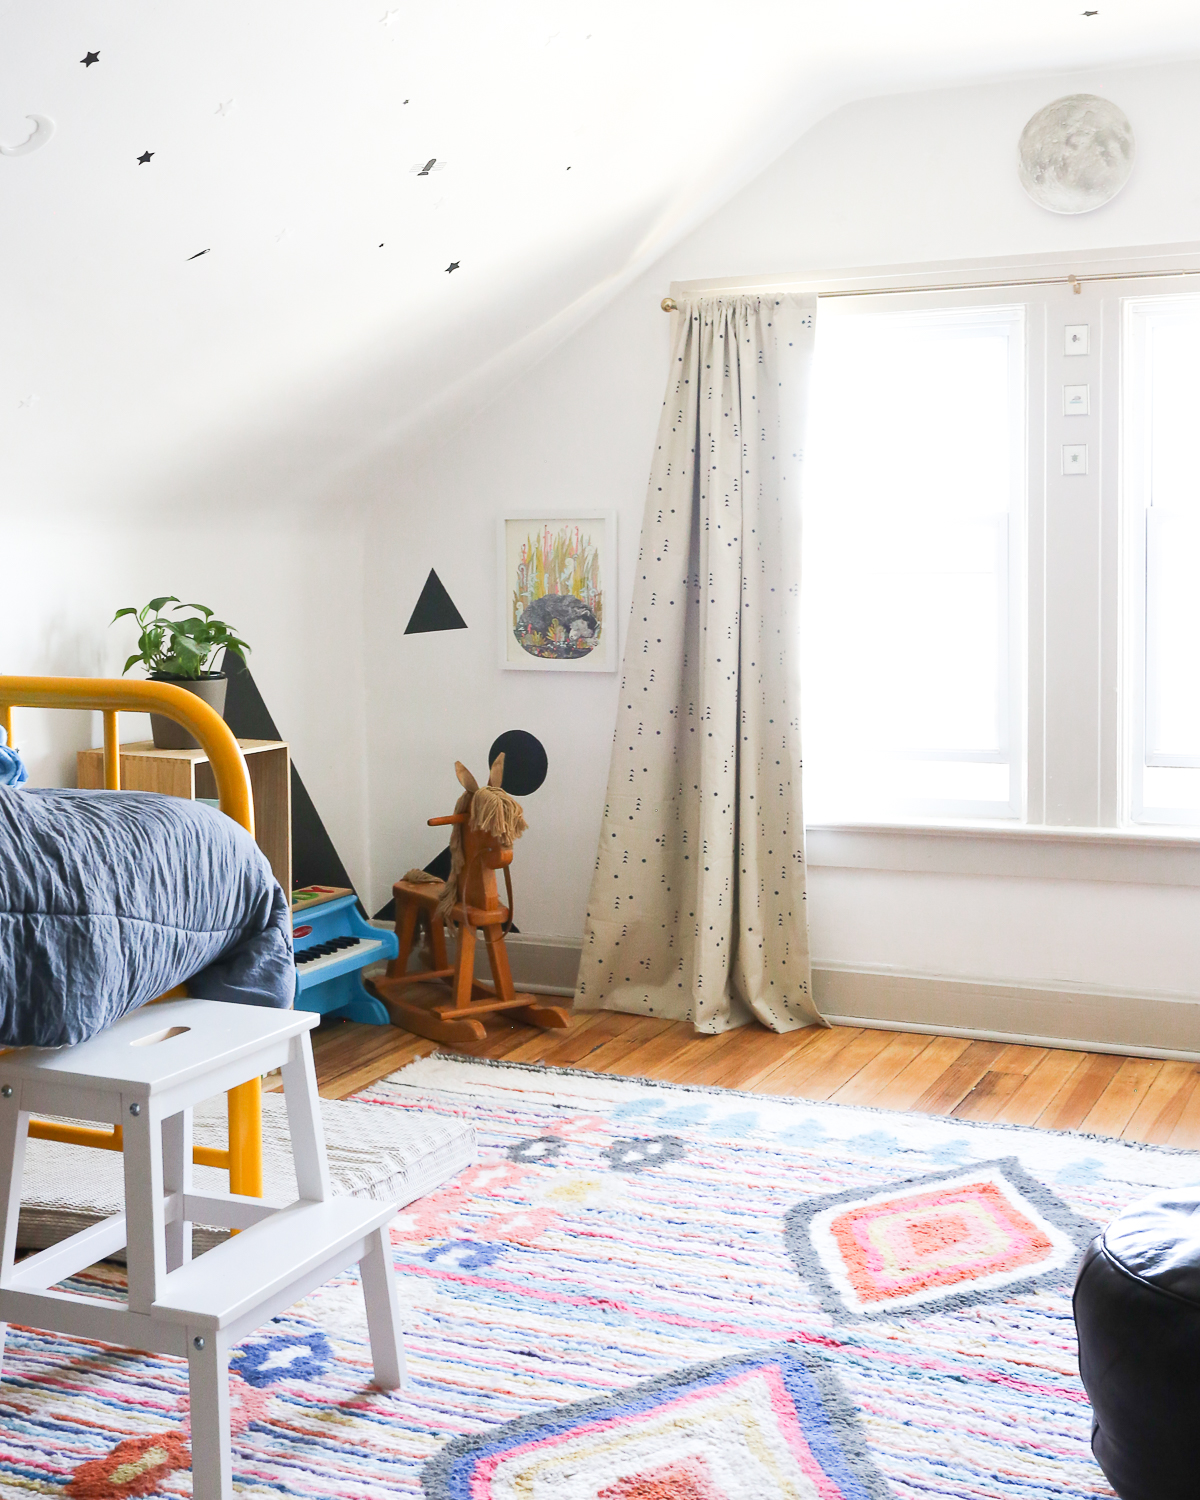
And here’s the same corner after we finished the work in his room.

The Product
If left to my own devices, I can’t even tell you what floor finish I would have purchased. Whatever was cheaper? (Floor finish is not cheap.) Something oil-based because it’s supposed to be more durable? Whatever came in the biggest bucket? Whatever had the coolest label?
Luckily, we’ll never have to know because I had the experts at Sutherlands to guide me. “This is what you want,” more than one person assured me while helping me load multiple cans of Verathane’s fast-drying, water-based floor finish into my cart.
 Maybe it was obvious I had no clue what I was doing. Or maybe they could tell that I’m the kind of person who has never fully followed the directions on a can of anything in my entire life. Or maybe it was all the rollers I already had in my cart. (The instructions on the back of the can clearly state: “To prevent bubbles in the finish, DO NOT SHAKE, do not over-brush or apply with a roller.”)
Whatever it was, I’m glad I listened to them because I’ll never use another floor finish. This stuff is magic.
The Process
After a day of ripping out the quarter round on the entire second floor (which uncovered a dead snake — a discovery I narrated with all the appropriate expletives in my IG stories), and pulling up staples and tacks, it was time to sand. I’d tell you more about that, except I gave Shawn the honor of that job. But it looked pretty easy, if super dusty. And if I had to do it myself, I’m sure I could have (though I’m glad I didn’t have t0).
Since Shawn is a busy man, I told him I could handle applying the polyurethane myself, even though I was secretly scared to. After all the horror stories I’d heard, and warnings I’d been given (most notably, “Do not apply the poly with a roller!”), I knew there was a good chance of me screwing it up.
So did I finally slow down and follow the directions exactly? No, of course not. Who do you think I am? Still, sealing the floor turned out to be a shockingly easy, and even somewhat satisfying, process. And YES I used a roller. I attached it to a broom handle and rolled every two hours (as per the directions on the can, thank you very much) until it seemed like I didn’t need to roll anymore. And then I rolled some more in a few spots, just for good measure.
I’m pretty sure I over-brushed, er over-rolled, a few times, too. And you know what? I just sanded out those spots and they’re so damn smooth my son sometimes slips on the floors. See? I told you. This stuff is idiot-proof.
AND IT’S FINE. EVERYTHING IS FINE.
In fact, it’s better than fine. I think it looks fabulous.


When I — EVENTUALLY — finish painting the hallway, the other two bedrooms, and the half bath, I’ll be back with another post all about paint, paint colors, and product sourcing. So stay tuned!
Like what you see? Follow me on Instagram!
Sutherlands provided me with a supplies budget in exchange for a blog post, photos, and social media posts related to this renovation. All words and opinions are my own.
Patio Party Cocktails with Article
Warning: This post is all over the damn place, but I promise you’ll get design! DIY! Drinks!

Earlier this summer (okay, I guess it was spring), my favorite furniture company, Article, asked if I wanted to partner on some summer patio content. Immediately, I responded with something along the lines of, “YASSS! My deck totally sucks!” And then I was all, “Oh, shit! My deck totally sucks.”
Really, you guys, it totally sucked.

In addition to the very clear view of the neighbors’ ugly garage, the deck was long, narrow, and awkward. It also opened into a leaf-filled mud pit between our house and garage. The only reason we even had it built was to satisfy our homeowners’ insurance because of a weird door that opened to nowhere (old house, long story). For the most part, it served as an expensive dog sunning spot/fancy fence. I mean, I guess as far as decks go, it was a nice enough pile of planks, but there was nothing spectacular, and very little that was functional, about it.
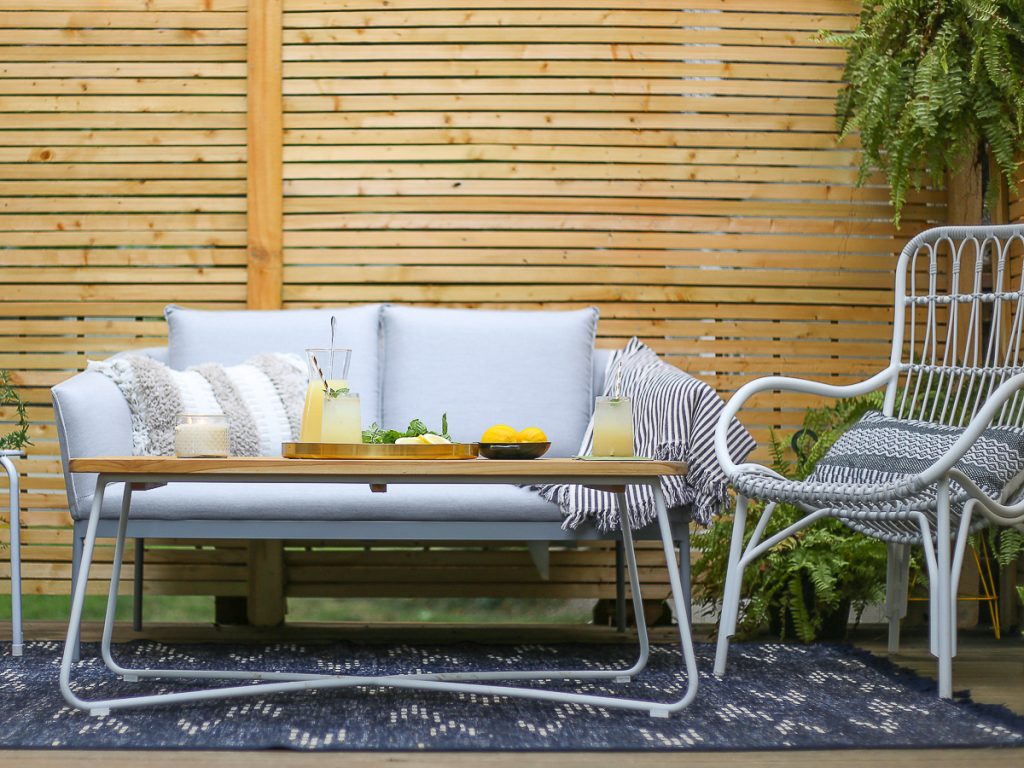
But I wasn’t going to let a funky space and fugly view keep me from featuring more of my favorite furniture. So, I measured and planned, consulted Kyle (and even took most of his opinions into consideration), and eventually decided on a fun mix of pieces from Article’s outdoor collection that would fit our less-than-fabulous, not-super-spacious deck.

On the left is the Aeri chair with slate gray cushions. If you think you might want to sink into it and never get up, you’re right! The loveseat (which is the perfect size for our weird-ass deck) is the Palo in Paloma Gray. It’s super light-weight and sturdy, and it’s on sale right now. The gorgeous white rattan-looking chair is called the Medan (also on sale!) and it’s actually mostly metal, which means it will probably last FOR-EV-AR. It’s basically my outdoor throne when I put on enough bug spray and sunscreen to actually go outside in the summer (more on that later). The coffee table is the Nimbus in white and while it’s intended for the outdoors, I’m not too fancy to put it inside, either.
Still, I couldn’t get over the fact that our deck was pretty much an eyesore and that I had to do something about it before taking pictures. It’s no secret that I tend to obsess over things, so I spent hours, and hours, and hours looking at pre-fab fence panels and slatted-wood privacy screens, but couldn’t find anything I liked — at least not that I could afford. So, I did what I always do next, and consulted Shawn (the renovation equivalent of my work husband) who told me, “Oh, those things are so easy to build. You can totally do it!”
BOOM! Problem solved. In theory, anyway.
Meanwhile, because apparently, miracles (or wonderful spouses) actually do happen, Kyle decided to take our toddler out of town for Memorial Day weekend so I could have some time to myself. THREE WHOLE DAYS TO MYSELF. AT HOME. ALONE. BY MYSELF. HOME ALONE. If you have kids, you know how big of a deal this is. So, instead of finishing my disaster of a second-floor paint job or tackling anything else on my giant to-do list, I focused all my energy on making our back deck picture-perfect, or at least “picture good enough.”
Okay, okay; I didn’t do it all by myself. I did convince Shawn to come over and help me frame out the panels, and he gave me a little tutorial (and pep talk) on finishing it. But he was right — it was super easy! I just used six-foot pressure-treated lath strips, galvanized nails, and some good, old-fashioned elbow grease. I mean, I hammered my thumb more than once, got a bazillion mosquito bites, and made more than one run to Sutherlands for some fence posts to cover the seams of the not-so-perfectly-cut Lowe’s lath. But in one long, sweaty weekend I built the three privacy panels for the corner of our deck. I also transported and laid 750 pounds of decorative rocks all by myself (which sounds like it would cover a lot of ground, but really, it doesn’t) and gave our chicken coop The World’s Worst Paint Job.


The following week, my furniture was delivered (and assembled by the delivery people!) and all of a sudden, my dud of a deck was a little outdoor oasis.


It’s gorgeous, right?
To be honest, though, I haven’t spent too much time out there yet because I hate — LOATHE, DESPISE, WANT TO PUNCH — summer. If you follow me on Instagram, you probably already know this. But now that the end of summer is in sight (on the calendar at least) I’m gearing up to spend all the time outside. And the boozy, bubbly lemonade I created to serve on my gorgeous new patio was inspired by the massive amounts of basil and mint that pop up in my little back-deck container garden in the late summer months.

So, without further, ado, my Late-Summer Lemonade…

LATE-SUMMER LEMONADE
A super-simple basil-mint syrup is the star of this recipe. And because the proportions are very basic, you can mix up one to cool off after a long, hot day, or prepare it as a punch for a patio party. Whiskey is my spirit of choice for this drink but vodka or tequila would work, too. You can also just skip the booze altogether.
NOTE: Most of the time, I recommend squeezing your own fresh lemon juice for cocktails, but if you’re making this in a big batch, that’s a lot of labor. Luckily, I’ve found a bottled lemon juice, Santa Cruz, that’s fabulous in cocktails. Just be sure to give it a good shake before you use it.
INGREDIENTS
1 part basil-mint syrup*
1 part lemon juice
1 part whiskey
2 parts club soda
Basil or mint sprig for garnish
DIRECTIONS
Add the syrup, lemon juice, and whiskey to a glass, mix well, add a handful of ice, give it another quick stir, then garnish with a sprig of fresh mint or basil.
*BASIL-MINT SYRUP
Yield: 2 cups
1 cup water
1 cup sugar
1 cup loosely-packed basil leaves (some stems okay)
1 cup loosely-packed mint leaves (some stems okay)
To make the basil-mint simple syrup, combine the sugar and water in a large saucepan over high heat. Stir well and bring it to a rolling boil, stirring occasionally, until all the sugar has dissolved. Remove the pan from the heat and add the herbs, stirring once to incorporate. Let the mixture steep for at least a half-hour (even better, let it sit until it cools completely). Strain using a fine-mesh sieve and discard the herbs, and transfer into a sealed jar or bottle. This will keep in the fridge for at least two weeks, but (honestly, it’s fine a lot longer — just covering my ass here).
Like what you see? Follow me on Instagram!
This post is made possible by a partnership with Article, who provided me with the pictured patio furniture in exchange for a blog post, recipe, photos, and social media posts.
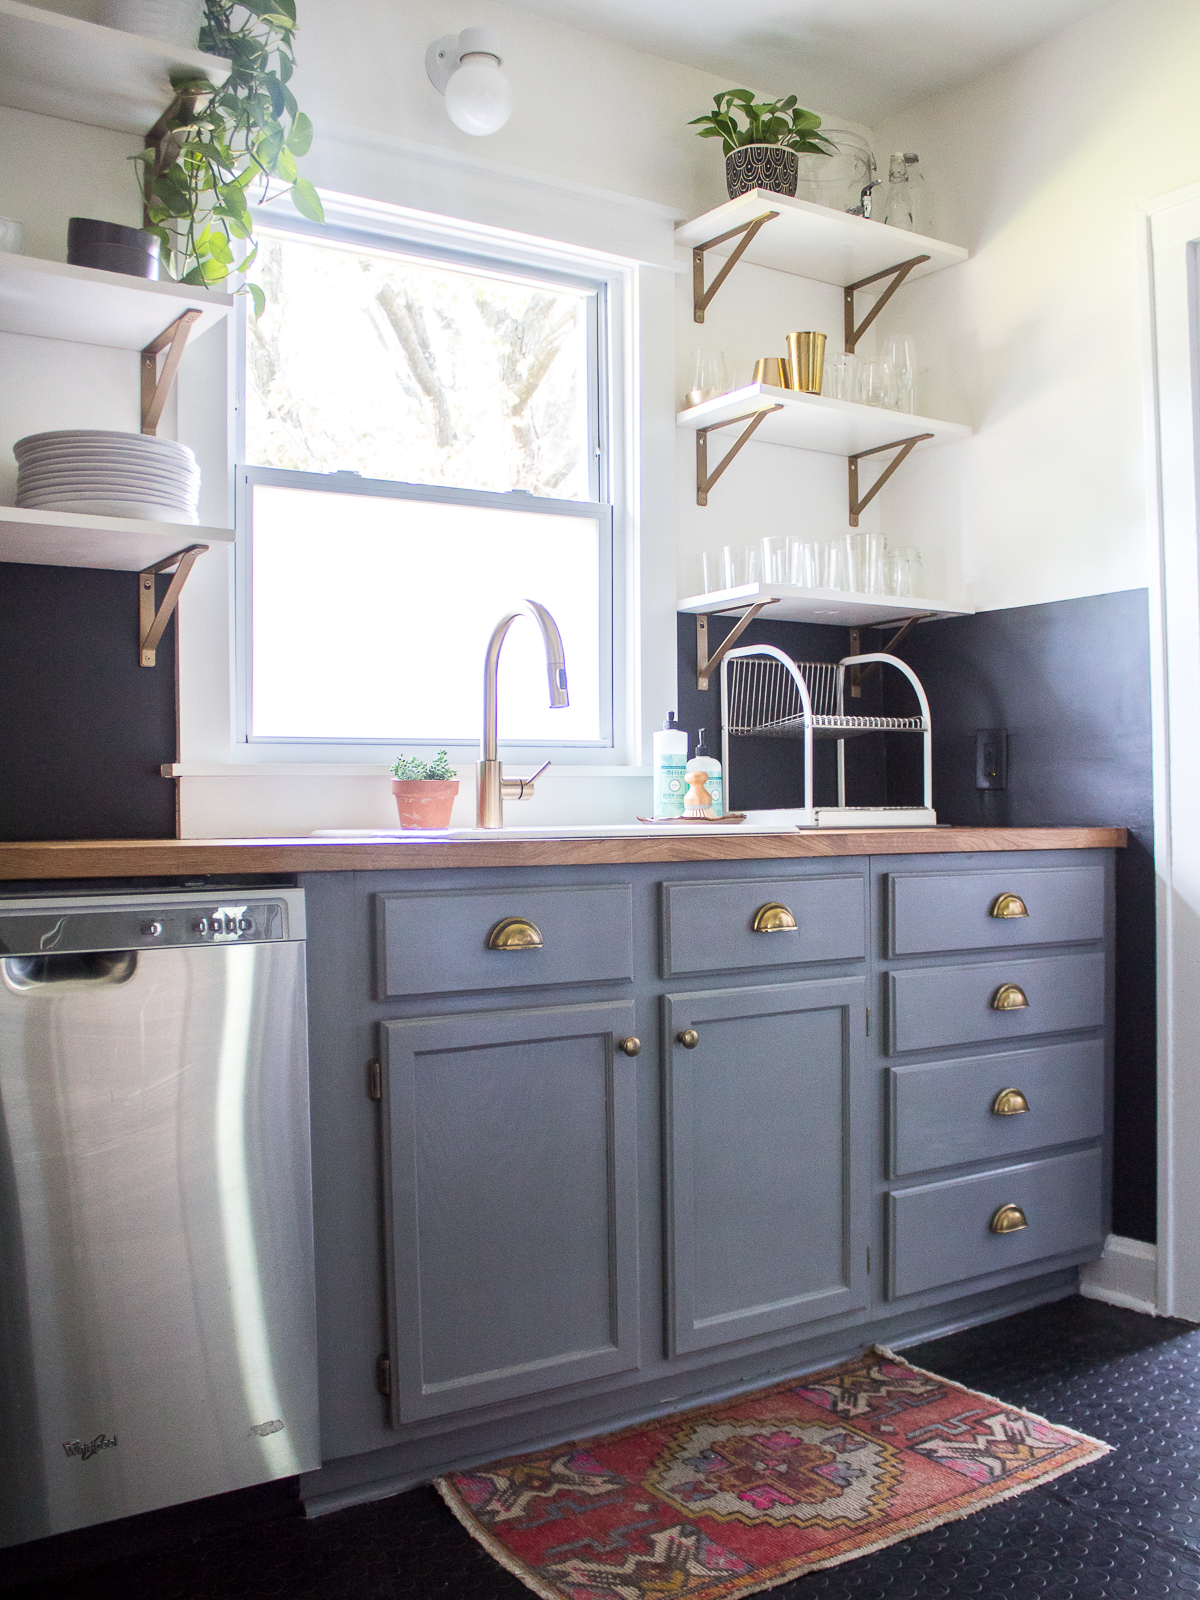
DIY Kitchen Renovation Reveal!
 Holy shit, you guys! I did it. Well, I didn’t do it all by myself. I had help from my husband Kyle, my Home Depot credit card (thanks for the mid-project limit increase/enabling, guys!), and my new BFF Shawn — who really gets all the credit and came over on the weekends to do all the things I thought I could do but actually had no business (or tools) attempting myself. With all that help, we renovated my kitchen in just about three weeks. I mean, I hardly slept, and I did mildly electrocute myself early on, but other than that, it all went fairly smoothly.
I could write The World’s Longest Blog Post about this kitchen renovation, but considering this is technically my first home decor post since my name change, and I’m still tired AF from all the renovation sleep deprivation, this is just the highlight reel. I’ll break down details for you later on. But if you have a question (like “What shade of black is that basic black paint?”), ask it in the comments and it could inspire a future post.
Now, before we get to the after, we have to start with the before. And we’re going way back — to when we bought this 1916 bungalow in 2013. The kitchen was a total shithole (almost bad enough to make us not want to make an offer) but I saw its potential and decided I could at least put some lipstick on that pig for a while. Lipstick in the form of paint, that is. Because paint makes everything better. Or at least look better. Of course, I didn’t know I was going to have a home decor blog five years ago — hell, I didn’t know I was going to have a home decor blog five weeks ago — so I wasn’t great about taking before pictures. But I did capture a few mid-paint-job shots before we moved in.

 I managed to make it okay enough. And after that initial mini makeover (removing some of the cabinet doors and painting the cabinets a dark gray, as well as painting the walls a cool gray color I immediately regretted), I made some additional improvements along the way, like swapping out the stainless cabinet hardware for brass, painting the walls a warm white, and putting black coin-dot rubber flooring over the most disgusting tile I’d ever seen (which you can see above). Stop-gap measures, you know?
Still, it wasn’t nice. It remained my least favorite room in the house. The countertops were old and cheap and gross, the almond sink was scratched and stained, and the bulky upper cabinets didn’t do anything to help the feel of the room — which doesn’t get a ton of natural light to begin with (okay, yeah, white might have been a better choice for the cabinets from the get-go).

 Not content with anything ever (I mean, the first home decor piece I ever wrote was called “My Design ADD” — who knew I’d get diagnosed with real ADHD a decade later?! — actually, anyone who’s ever met me), I needed to make it better, and prettier. MORE INSTAGRAM WORTHY. Plus, I got an assignment from the DIY Network: How to replace your kitchen cabinets with open shelving (here it is, by the way). Which I might have begged them to give me so I could convince Kyle that I had to do this. FOR WORK.
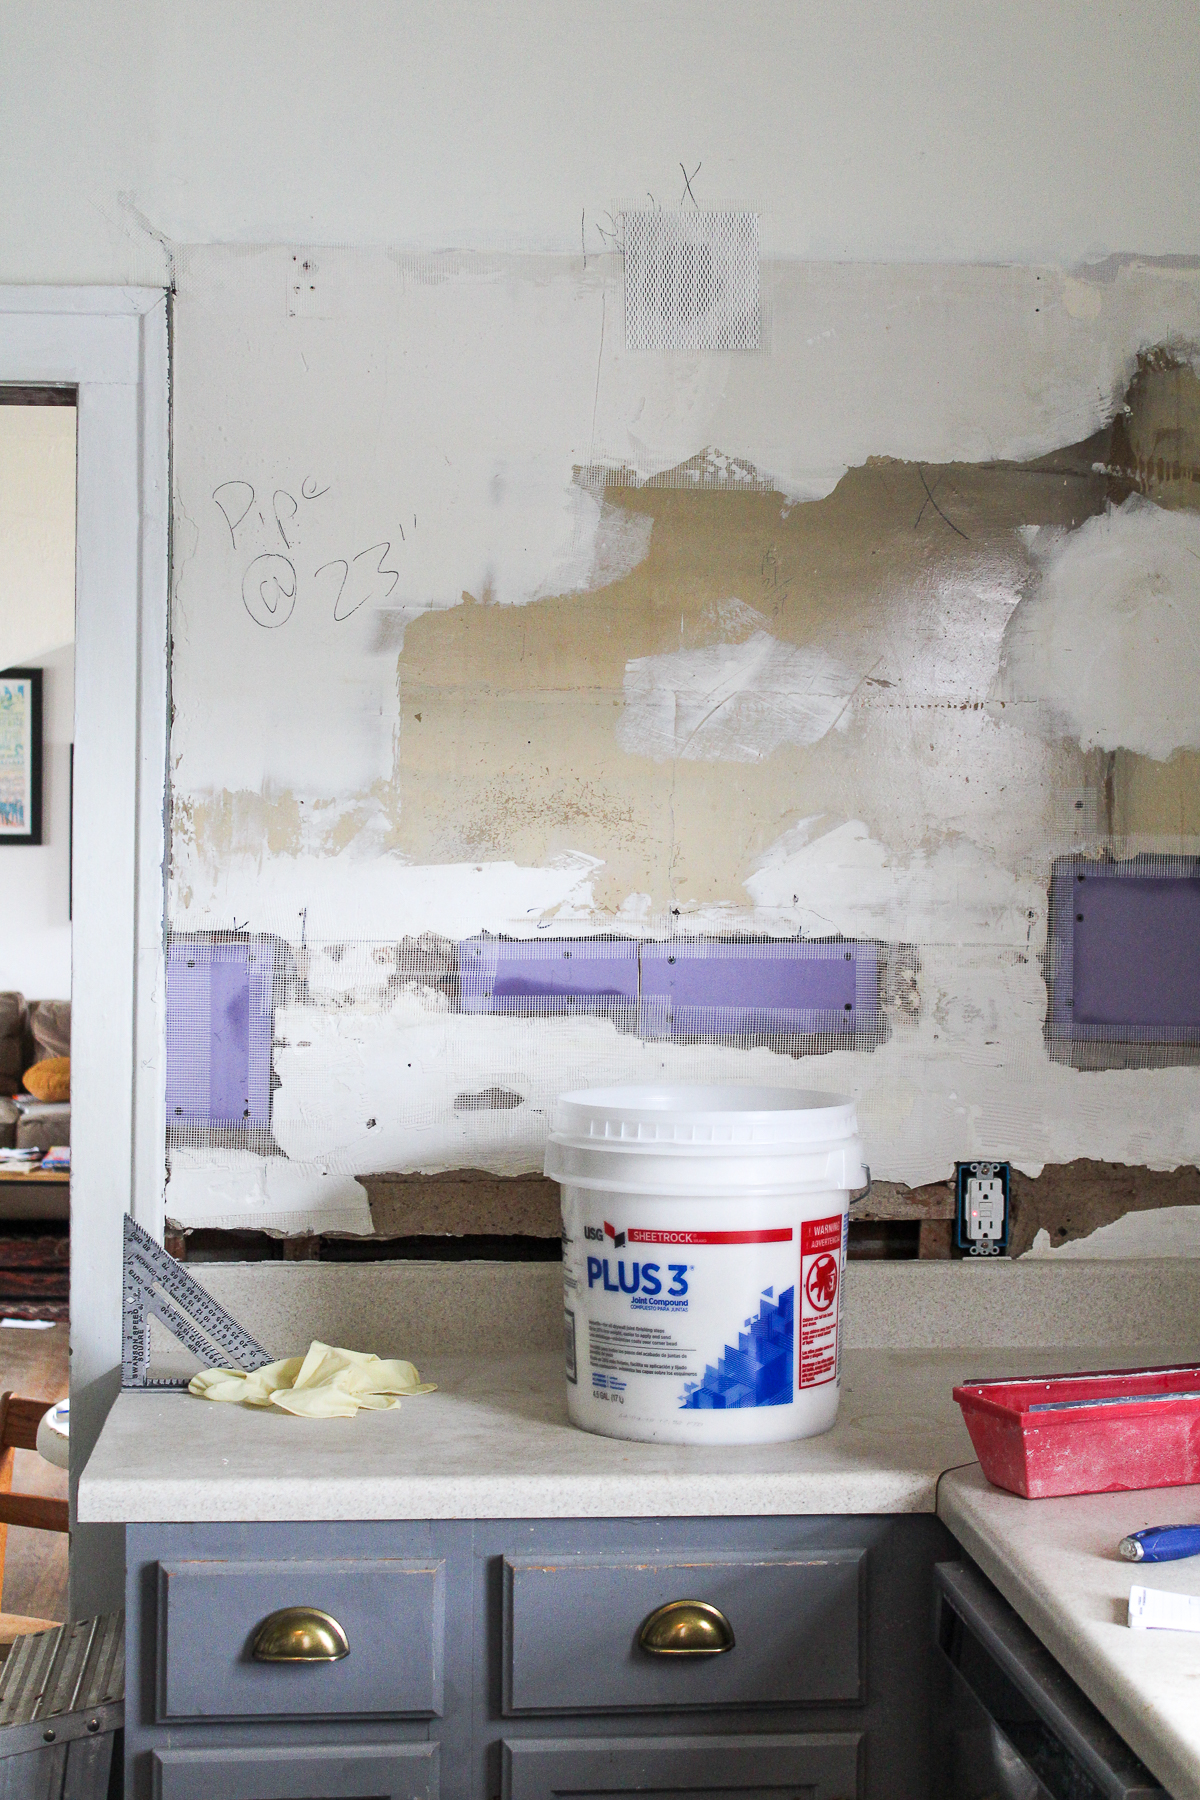
Since my livelihood and future career prospects clearly depended upon this project, I DM’d Shawn and we hatched a plan! I should probably point out that four weeks ago, Shawn was just my high school friend’s husband. But 976 Instagram messages and three dust-filled weekends later, he’s basically the Jonathan Scott to my [whoever those blonde ladies are who boss around the construction dudes on HGTV]. I’m sure he’s about to get real sick of me and all my to-dos, but he’s launching his own renovation and restoration business, so at least I won’t be the only one telling him that my photo-worthy backsplash made of joint compound and paint will be JUST FINE.
 Before I knew it, I was chiseling away at shitty white tiles and taking a ton of plaster with them. The plaster was so old it had horse hair in it! Horse hair! Obviously, repairs needed to be made, and Shawn taught me how to skim. When left to my own devices, I used an entire 5-gallon bucket (and then some) of joint compound to fix up the rather small area where the backsplash had been. I regret nothing.
So cabinets got ripped down, walls got repaired, the sink and faucet got replaced, and I painted more meticulously than I’ve ever painted in my life (more on that and my magnificent black half wall another day). By the third weekend, we were putting up shelves. I’m super impressed that we did it so quickly, and that it turned out so well.
 To be honest, the sink feels a little small, and is smaller than the two-compartment sink we took out (I fucked up the measurement) but it’s nice to have the additional counter space. Plus, I can fit a sheet pan, stock pot, or baby in it. And the smaller the sink, the fewer dishes will pile up in it. I hope. We can always cut a bigger hole later.

 Just when we thought we were finished, I decided that the spot where we do most of our prep was a bit too dark (black isn’t exactly the brightest color) and remembered I had this IKEA clamp light in a closet. I was worried about what to do with the super long cord, but I kind of dig my solution (though everyone else seems to hate it).


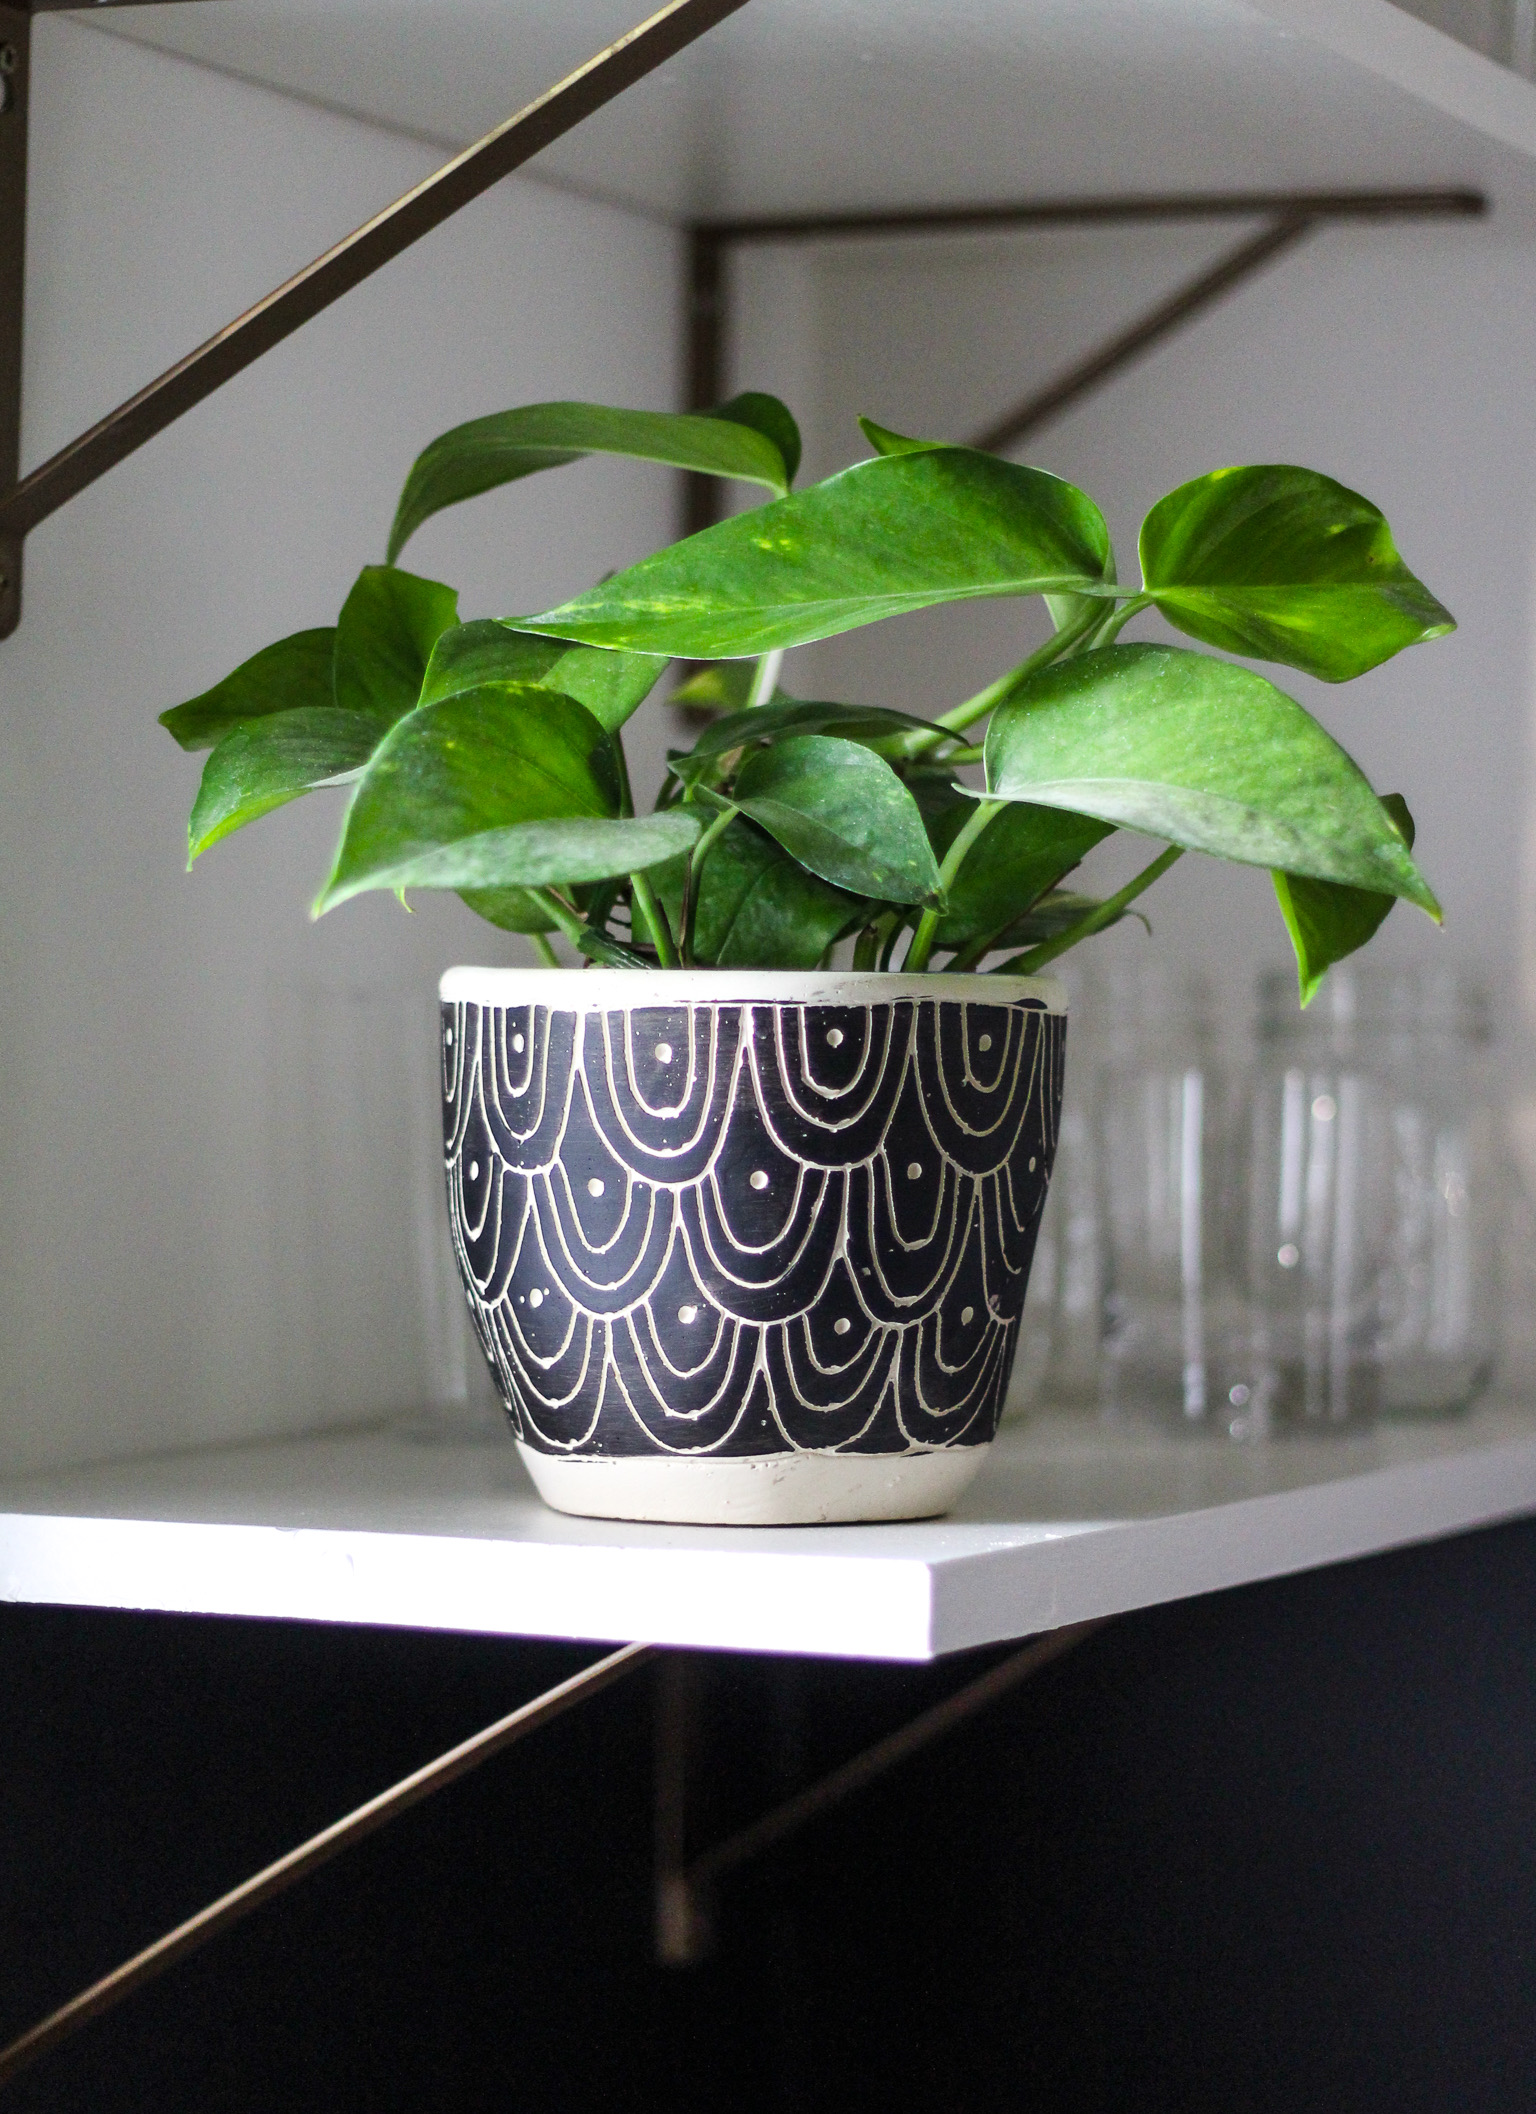
 I made two snap decisions mid-renovation, and I’m so glad I did. One was spray-painting the shelf brackets a bronze-y gold (they were white to begin with). The other was getting a sexy black ductless hood to go over the stove — even if I can’t manage to get a sexy picture of it.
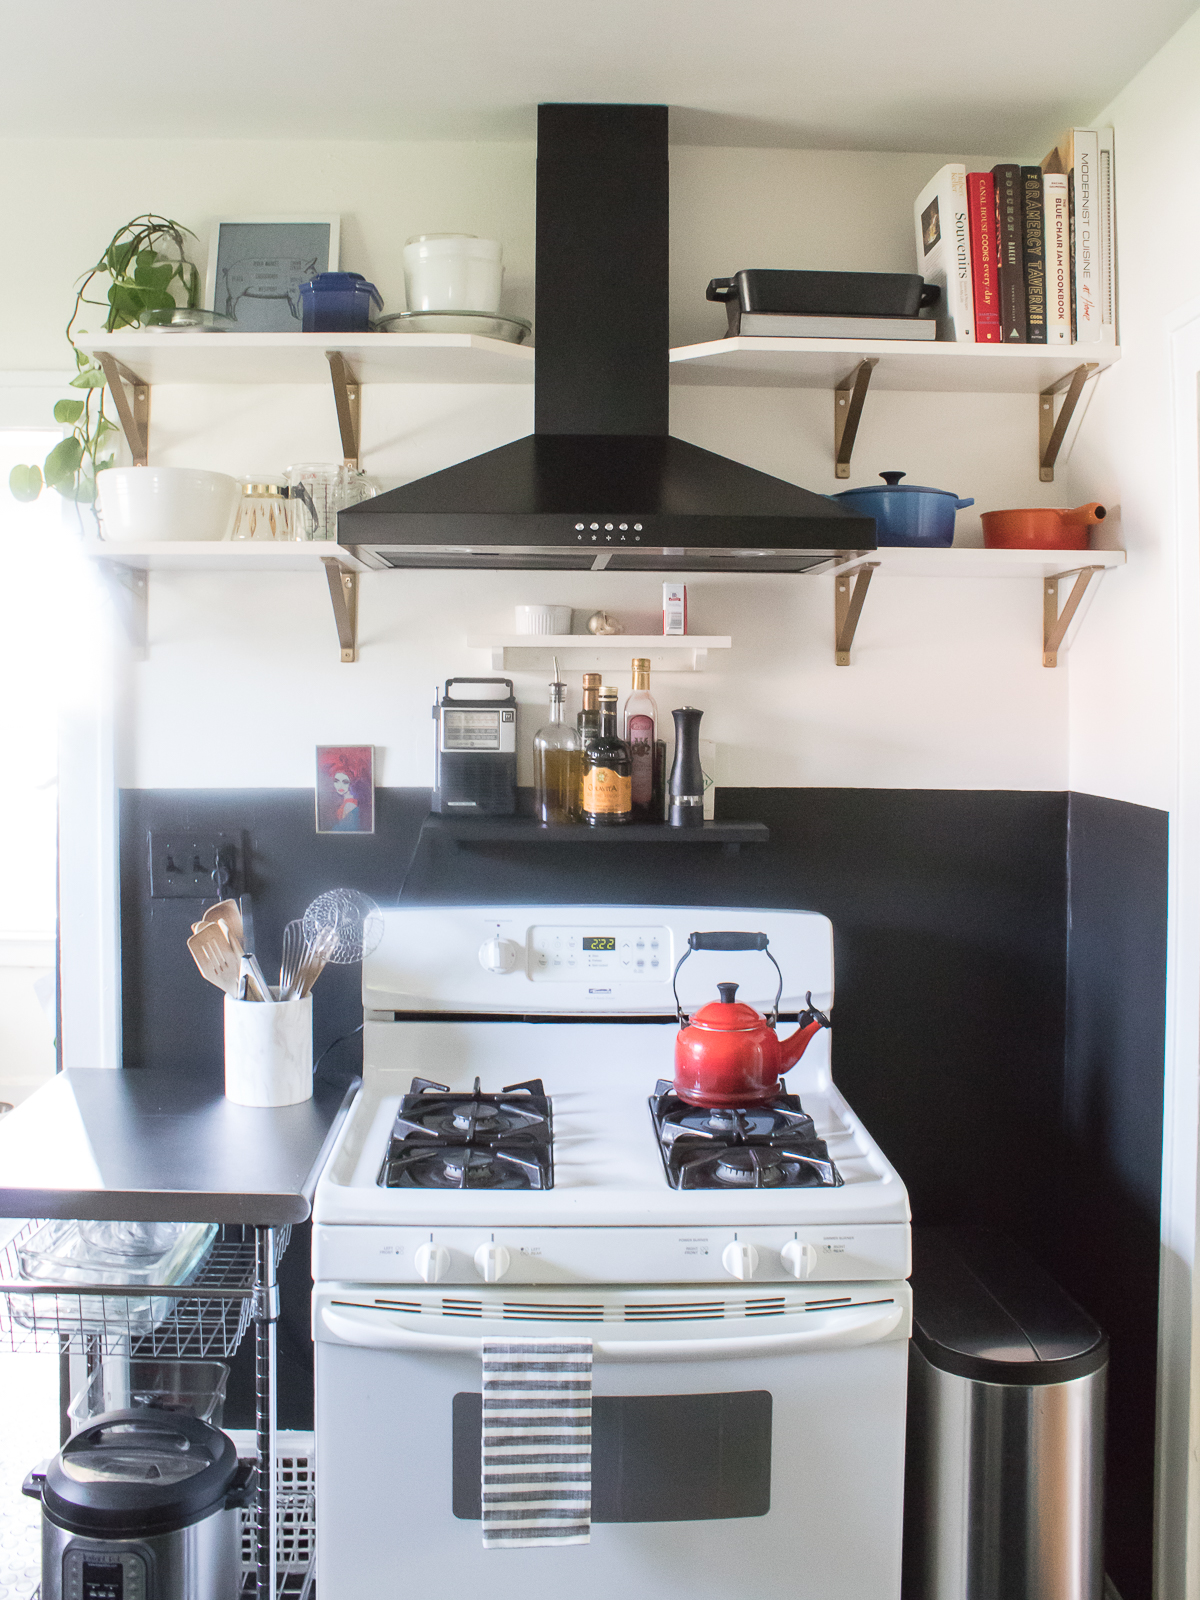
 Here’s a little recap of what we did:
- Removed the upper cabinets and backsplash
- Patched and painted the walls
- Replaced the countertops (IKEA Karlby)
- Replaced the sink (Kohler Mayfield)
- Replaced the faucet (Delta Trinsic in Champagne Bronze)
- Replaced white outlets and switches with black ones
- Painted the ceiling (god, that fucking sucked)
- Replaced the light fixtures (Ceiling, Sink)
- Repainted and polyurethaned the lower (and only remaining) cabinets
- Installed a ductless hood (Winflo, 30-inch) which was the best decision ever!
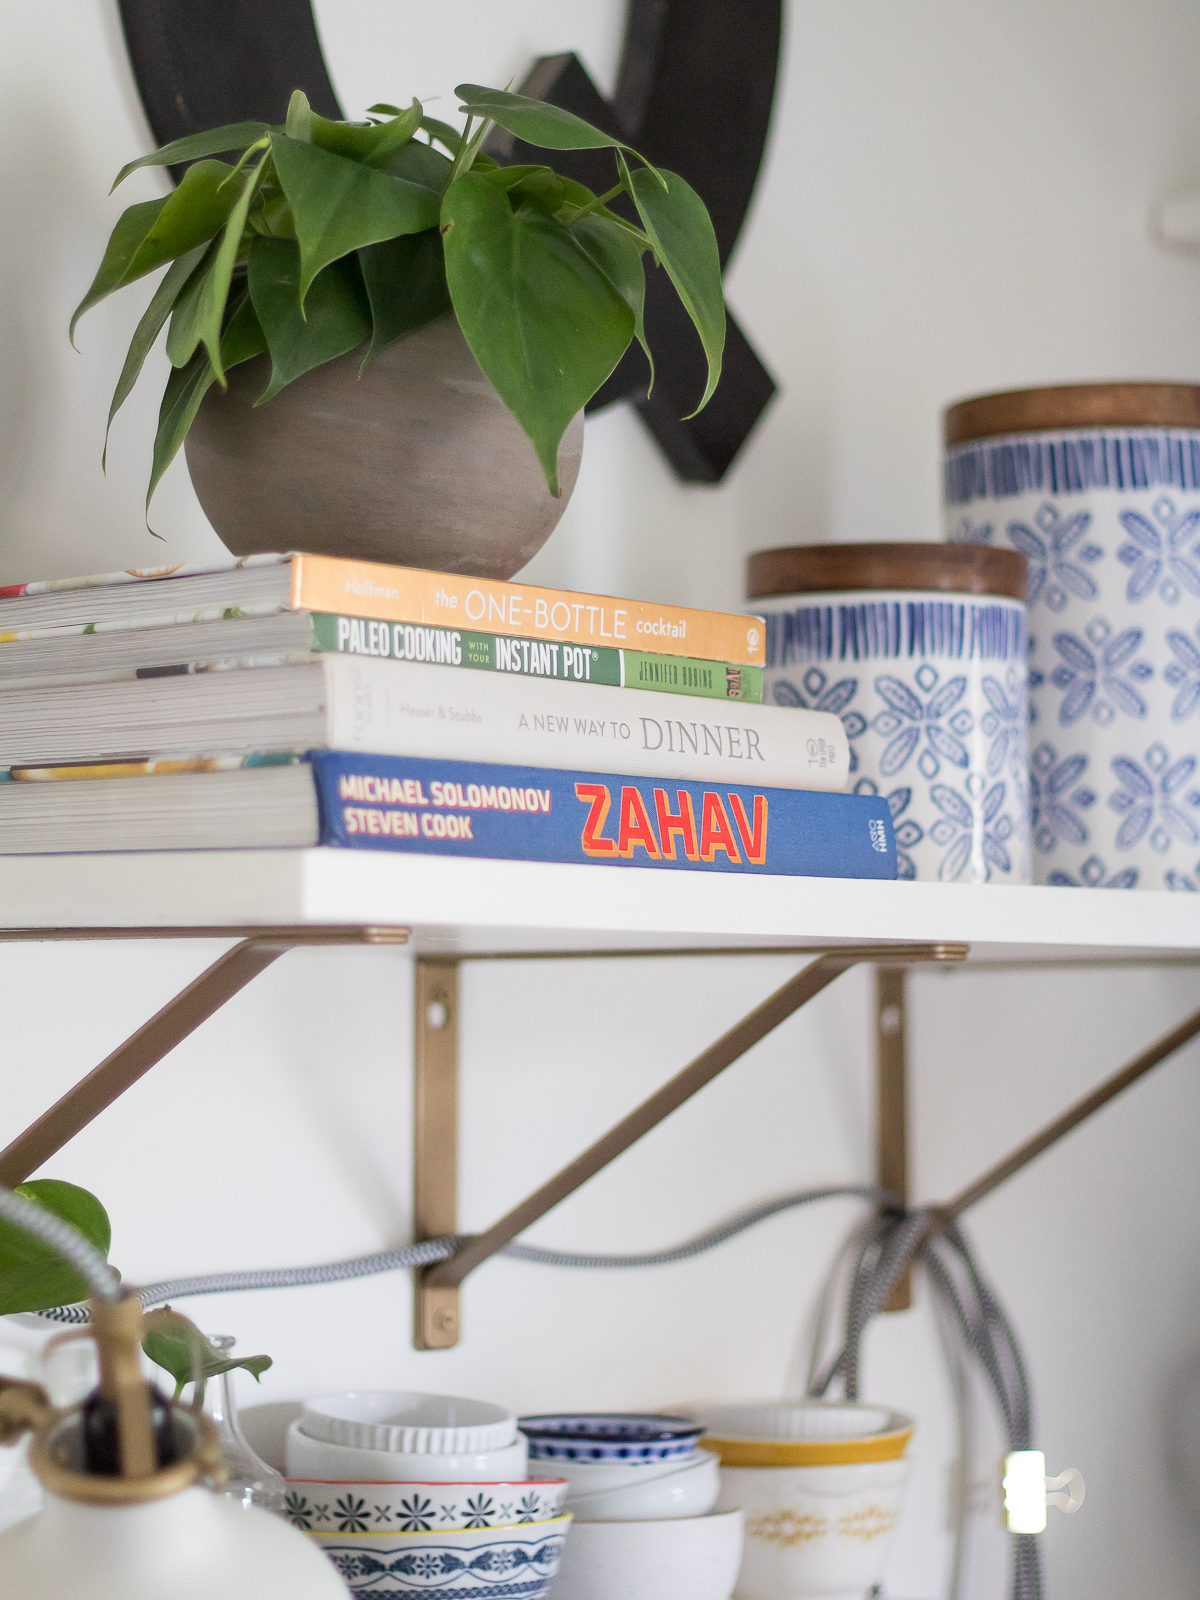
- Painted and installed the shelving brackets (Closetmaid)
- Painted and installed the shelves (1″ x 12″ common boards)
Of course, there were lots of other little things, too but I’m trying to keep this from being The World’s Longest Blog Post. And remember: You can ask me anything in the comments, and I’ll write more about this soon. Just know that if you ask how much it all cost, I may curl up into the fetal position and put a blanket over my head like I do every time Kyle tries to talk to me about money. Honestly, I don’t even know how much I spent, but I’m guessing with all the overbuying I did (because who wants to rinse a fucking paint roller at 3 am) probably close to $2,500.
Totally worth it, right?! RIGHT.
Like what you see? Follow me on Instagram!